


Put together a delicious Easter spread full of uncured and gluten-free centerpiece hams—every bunny will say
the meal is “ham-tastic!”
the meal is “ham-tastic!”
Baked Ham with Apricot
and Orange Glaze
Flavors from the apricot and orange will surprise your taste buds and have everyone going back for seconds.
Thanks to Alyssa at AlyssaKayle.com for this recipe.
View Recipe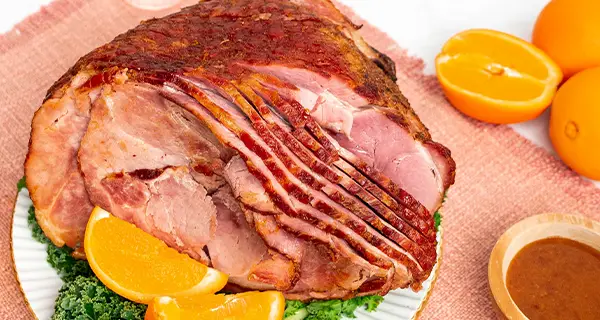
Pomegranate Maple Glazed Ham
Roasted with a sweet and decadent glaze, this ham features flavors of pomegranate, citrus and maple.
View Recipe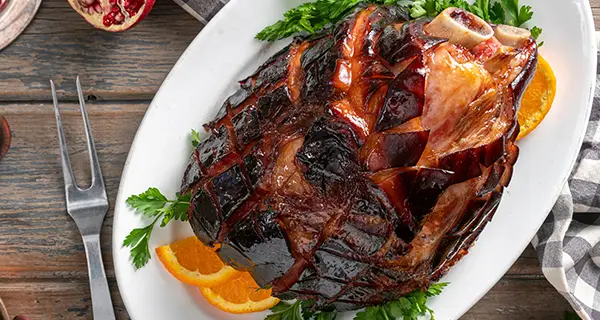
Slow Cooker Honey Glazed Ham
Take the stress out of Easter with this easy-to-make slow cooker ham covered in a honey glaze with brown sugar and cloves.
View Recipe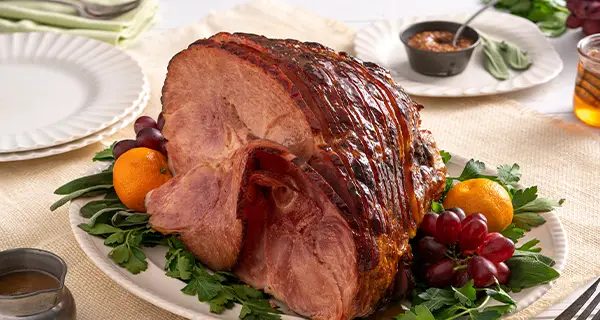
Garlic and Pineapple Glazed Ham
This ham has maximum flavor with its pineapple, garlic and dijon glaze with notes of brown sugar and cloves.
View Recipe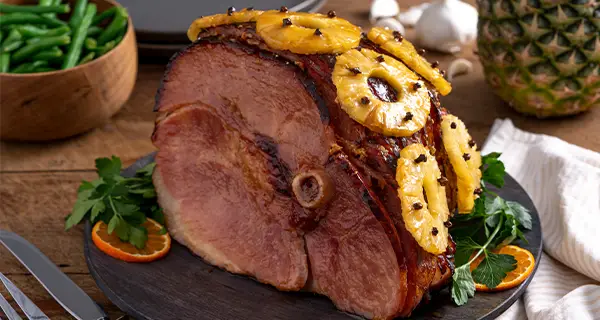
Herb and Citrus Glazed Ham
Serve up a zesty ham smothered in herbs and fresh citrus for a satisfying sweet and herbaceous flavor.
View Recipe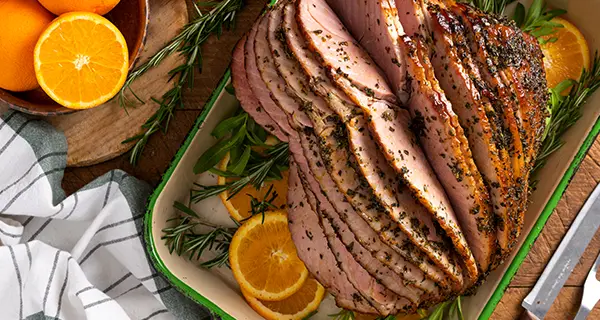
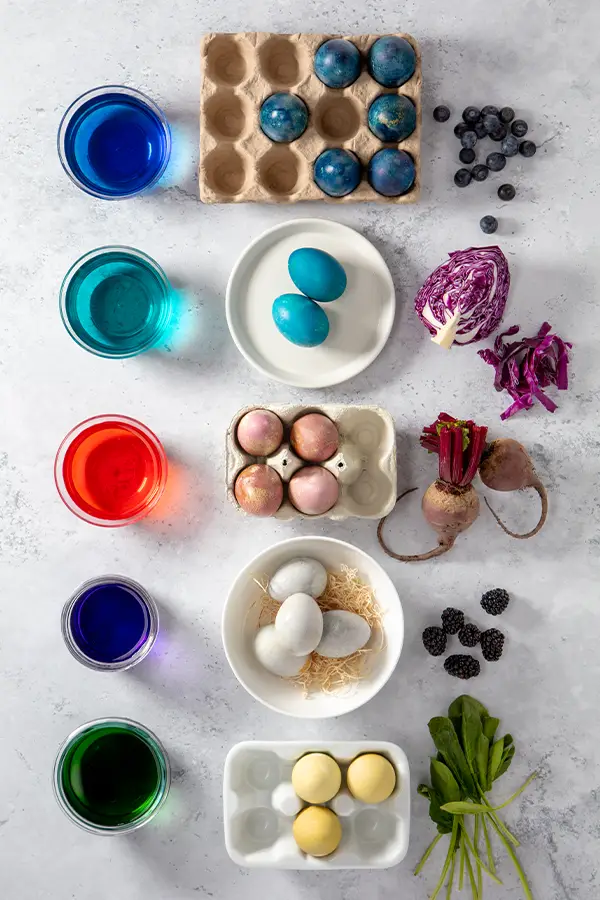
Dye Your Eggs Naturally


Easter’s right around the corner, so skip the egg dye kits this year and go natural! Save time and money by making your own all-natural egg dye using ingredients like fresh berries and spinach straight from your very own kitchen! Egg-cellence is guaranteed.
Ingredients:
- Eggs
- 1 tsp. Salt
- 2 Tbsp. White vinegar
For Yellow/Green Dye:
1 cup spinach, chopped
For Blue Dye:1 cup cabbage, chopped
For Dark Blue Dye:1 cup blueberries
For Blue Dye:
For Dark Blue Dye:
For Red Dye:
For Purple Dye:
How to:
- Boil eggs and let cool.
- Gather the different produce items you’d like to try as a colorant (example: spinach, etc.).
- Measure out at least 1 cup of each produce item.
- Add 2 cups of water to a pot, and add at least one cup of produce. You will need a separate pot or pan for each colorant.
- Bring mixture to a boil and then turn heat down to a simmer for 15 minutes.
- Pour through a sieve into a container.
- Add 1 Tbsp. of vinegar and stir. If you’re working with kids, let cool before use.
- Rub egg with a bit of vinegar with a cloth or paper towel. Place the egg into the container. The longer you leave the egg in, the deeper the color.
- Take eggs out of dye and let dry for several hours or overnight before handling.
For extra vibrancy, create a more concentrated dye with more produce and less liquid.
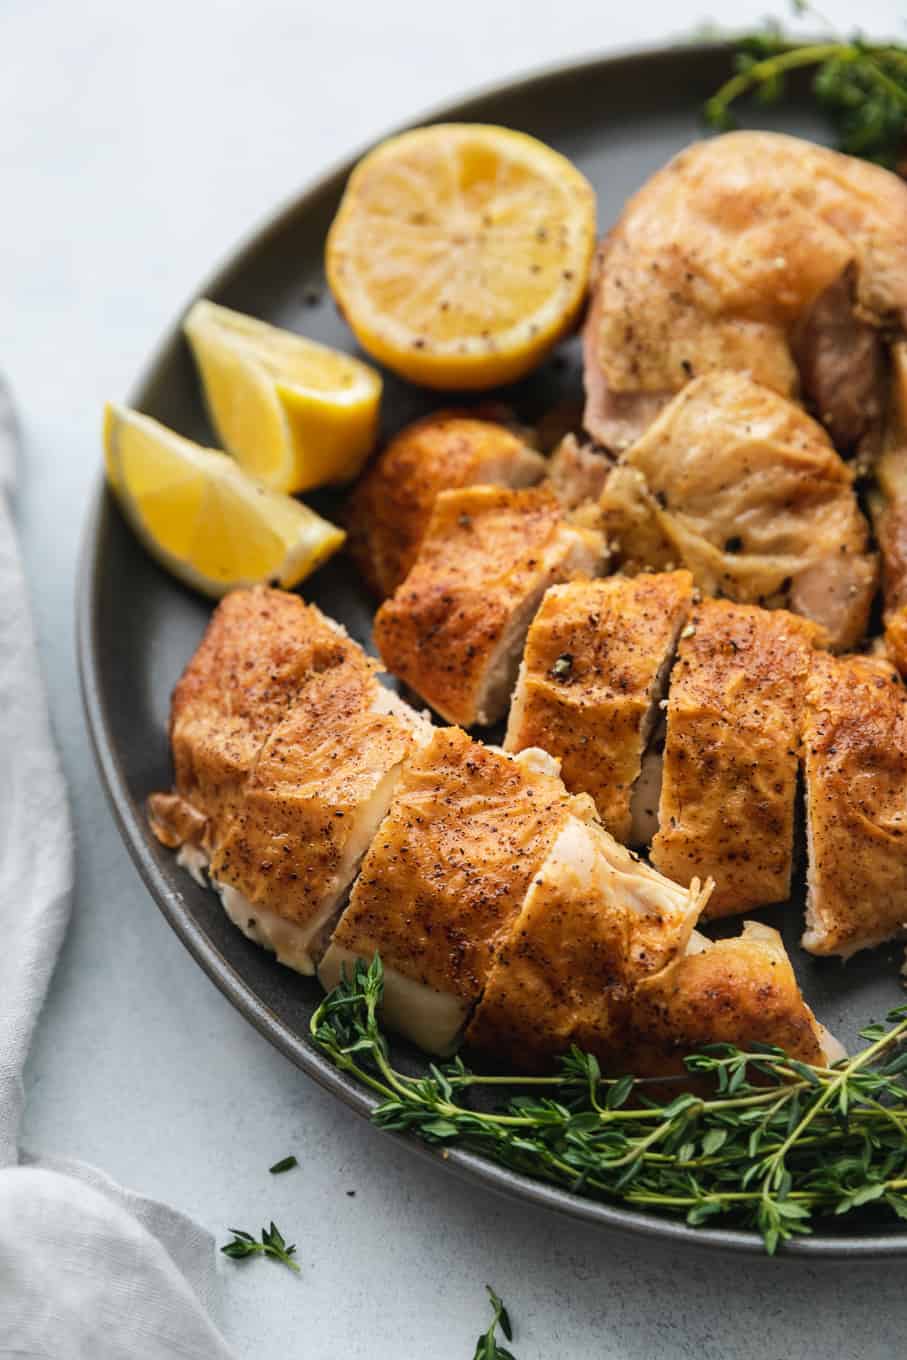
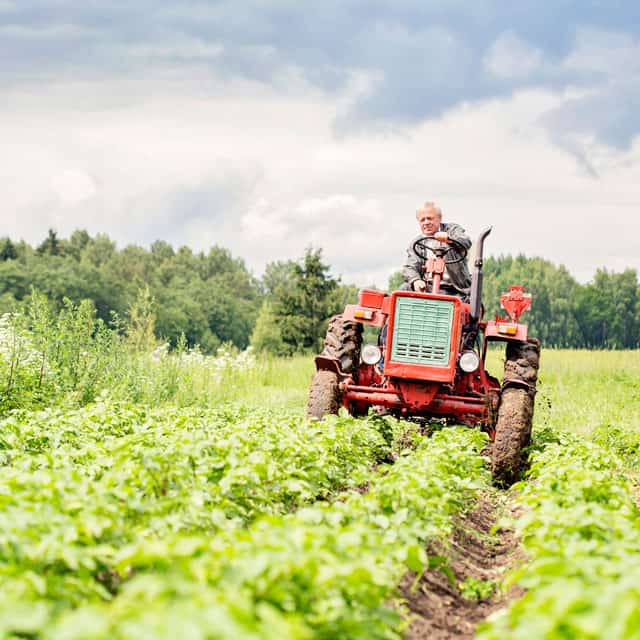
Air-chilled Chicken Recipes
We are now proud to carry air-chilled, organic chicken in all stores! With better flavor and texture, our organic air-chilled chicken is tender. The skin is crispy while keeping the chicken incredibly juicy. The air-chilling process is kind to the earth, saving thousands of gallons of water a day.
 Roasted over a bed of root vegetables for extra flavor, this recipe couldn’t be simpler or more foolproof. Recipe provided by our blogger friend, Molly, at Spices in my DNA.
Prep time: 15 minutes
Cook time: 80 minutes
Serving size: 4
Roasted over a bed of root vegetables for extra flavor, this recipe couldn’t be simpler or more foolproof. Recipe provided by our blogger friend, Molly, at Spices in my DNA.
Prep time: 15 minutes
Cook time: 80 minutes
Serving size: 4
Prep time: 15 minutes
Cook time: 300 minutes
Serving size: 4
 We love tasty chicken, and we especially love tasty chicken done in under an hour! Grab your instant pot multicooker and have dinner ready in a flash. *Note: for every pound add 6 minutes, for every half a pound add 3 minutes to total cooking time for whole chickens. Recipe provided by our blogger friend, Kate, from Root Revel.
Prep time: 10 minutes
Cook time: 45 minutes
Serving size: 4
We love tasty chicken, and we especially love tasty chicken done in under an hour! Grab your instant pot multicooker and have dinner ready in a flash. *Note: for every pound add 6 minutes, for every half a pound add 3 minutes to total cooking time for whole chickens. Recipe provided by our blogger friend, Kate, from Root Revel.
Prep time: 10 minutes
Cook time: 45 minutes
Serving size: 4
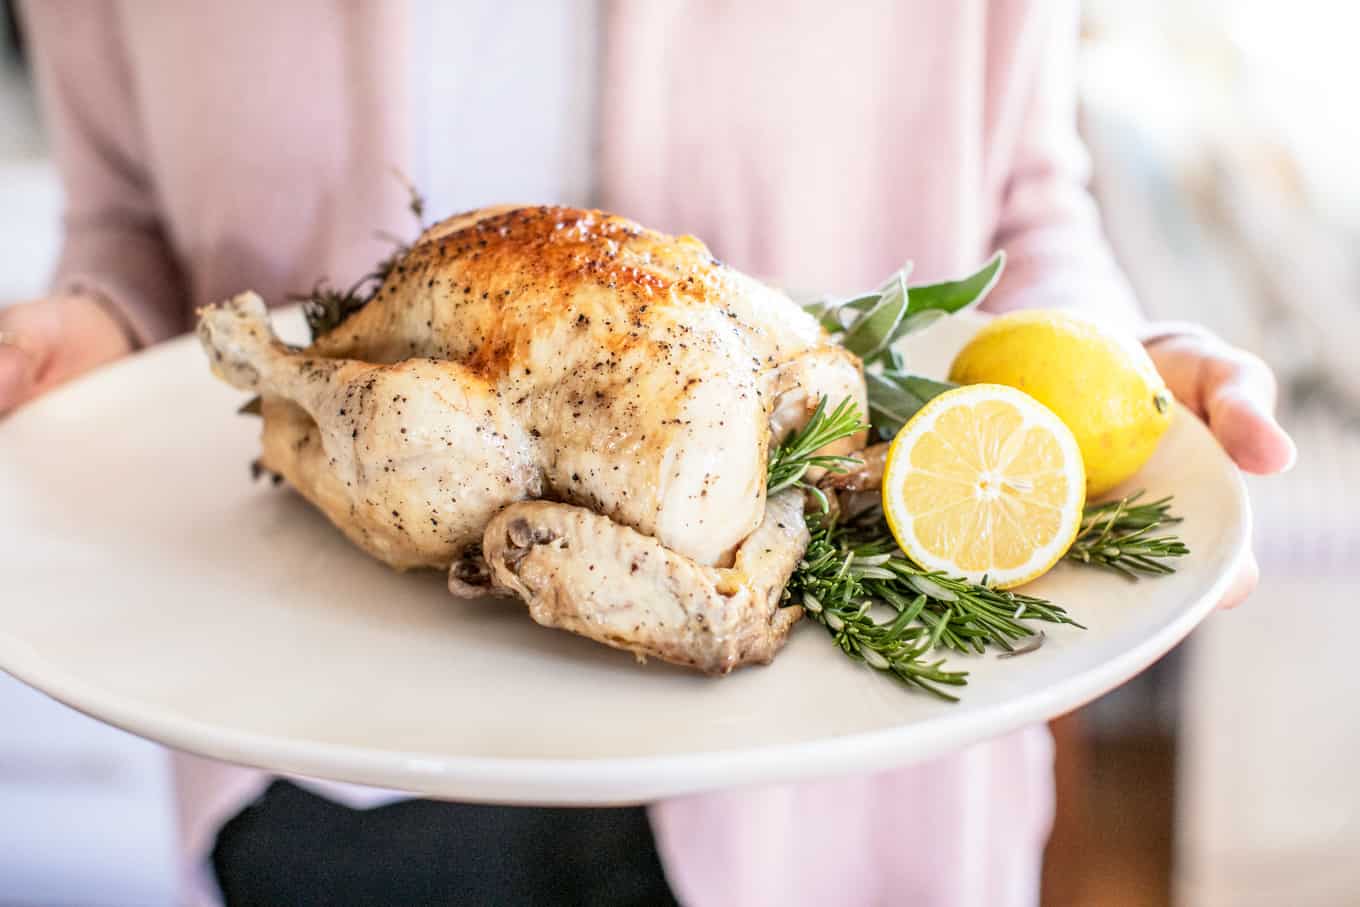
Easiest Roasted Chicken
Roasted over a bed of root vegetables for extra flavor, this recipe couldn’t be simpler or more foolproof. Recipe provided by our blogger friend, Molly, at Spices in my DNA.
Prep time: 15 minutes
Cook time: 80 minutes
Serving size: 4
INGREDIENTS:
- 3.5 lb. Organic Sprouts Whole Chicken
- 2 tsp. Sea salt
- 1 tsp. Ground black pepper
- 1 Lemon, halved
- Several sprigs of fresh thyme
- 1 cup Red potatoes, cubed
- 1 cup Sweet potatoes, peeled and cubed
- 1 cup Parsnips, cubed
- 1 cup Celery root, cubed
- 1 1/2 tsp. Olive oil
- 3/4 cup Chicken broth
INSTRUCTIONS:
- Preheat oven to 425°F. Rinse your chicken under cold water and dry very well with paper towels. You want the chicken to be as dry as possible so it develops a crispy crust!
- Season the inside of the cavity with a couple pinches of salt and pepper. Rub the outside of the chicken generously with the salt and pepper. Stuff the cavity with the halved lemon and thyme. I like to stuff in half of the lemon, a couple sprigs of thyme, the other half of the lemon, and then the remaining thyme.
- Truss the chicken using butcher’s twine. Check out this video on how to truss. Trussing will ensure your chicken cooks evenly.
- Place the root vegetables in a heavy, large, oven-safe skillet, like a cast iron. Alternately, you can use a shallow roasting pan or rimmed baking sheet. Toss the vegetables in the olive oil and a couple pinches of salt and pepper.
- Arrange vegetables in a single, even layer. Place the trussed chicken on top of the vegetables and pour the chicken broth over the vegetables. Bake for 1 hour 20 minutes to 1 hour 30 minutes, or until outside of the chicken is golden brown and crispy, the meat feels firm when pressed, the juices run clear. If you have a thermometer, the meat near the inner thigh (between the leg and the breast, reads 165°F.
- Let chicken rest for 10–15 minutes or so before carving. This ensures a super juicy bird! At this point, I discard the root vegetables. They really serve just as a bed to roast the chicken on, and they provide a lot of flavor to the bird.
Slow Cooker Garlic Butter Chicken
Topped with a delicious and easy gravy, this recipe is low-carb and keto-friendly, with Paleo and Whole30® options. Note: You’ll also need aluminum foil, kitchen twine and a pastry brush. Recipe provided by our blogger friend, Cheryl Malik, at 40 Aprons.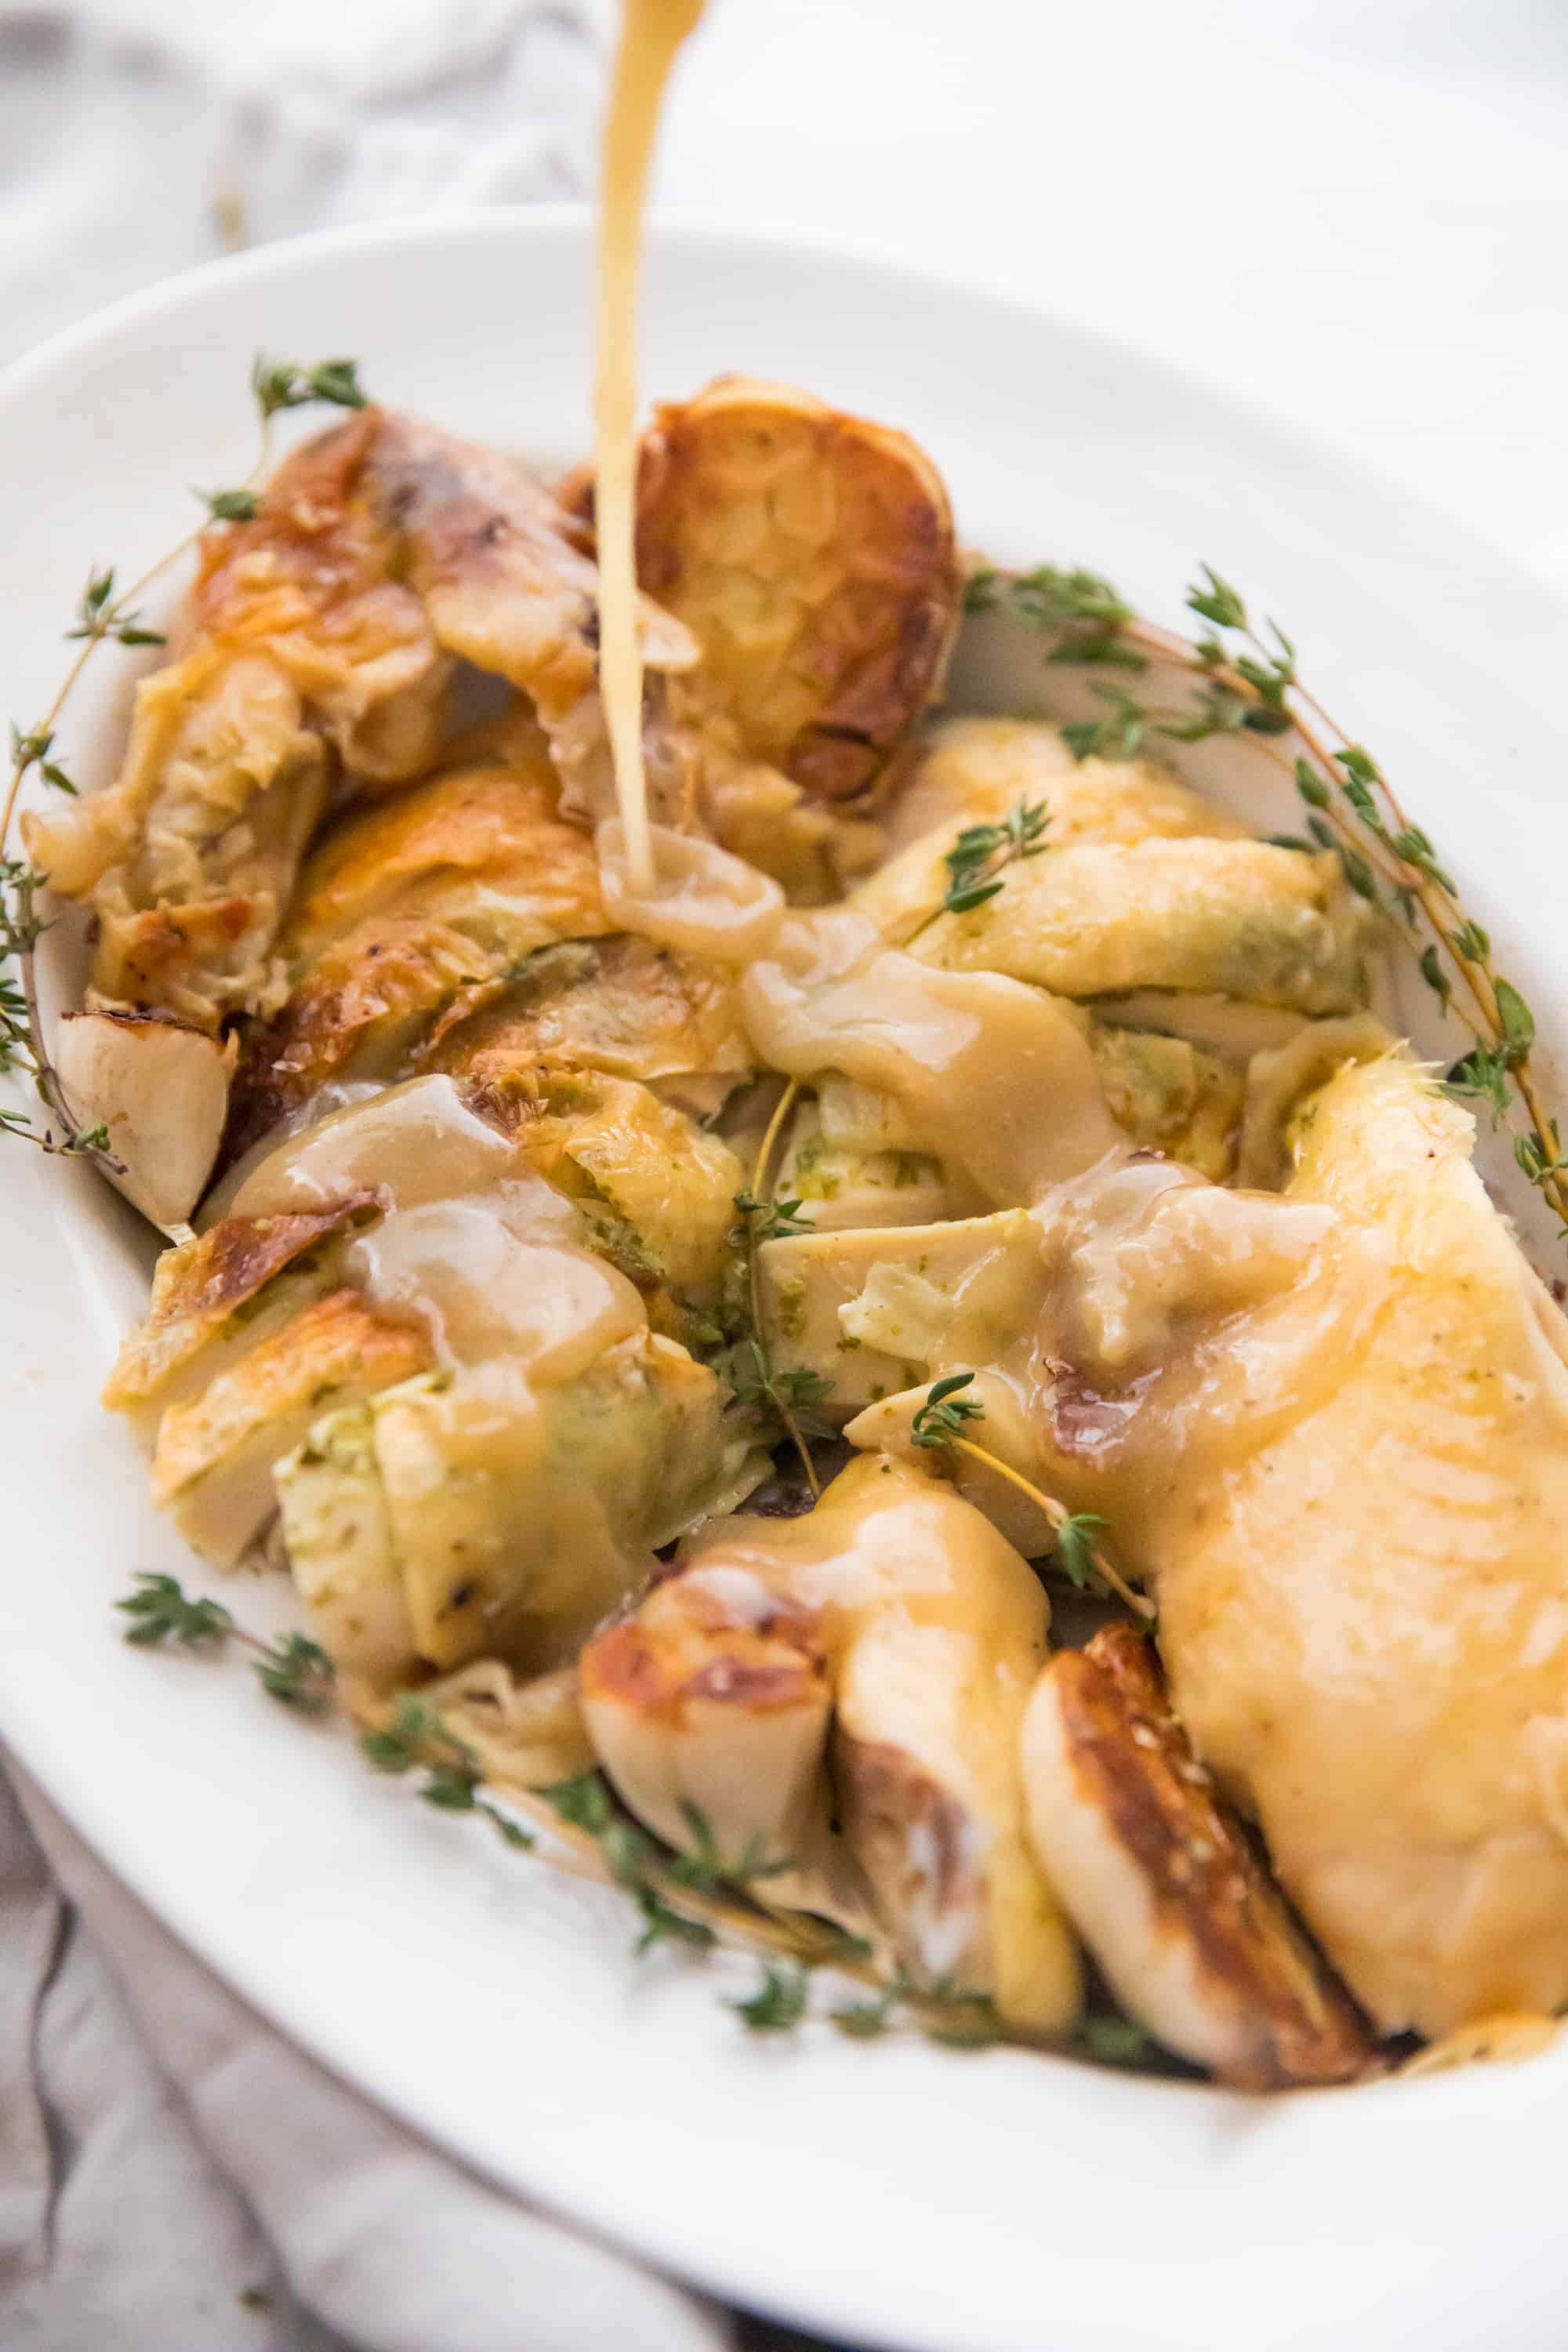
INGREDIENTS:
- 1/4 cup Fresh parsley
- 3 Garlic cloves, peeled
- 4 Tbsp. Unsalted butter, softened
- 1+ tsp. Salt
- 1 Garlic head, sliced in half crosswise
- 3-4 lb. Sprouts Organic Whole Chicken, giblets removed
- 1 Tbsp. Avocado or olive oil
- 3 Tbsp. Cassava flour
- 1/2 cup Chicken stock
INSTRUCTIONS:
- For the garlic butter: In a food processor, combine parsley and garlic. Pulse until chopped. Add softened butter and salt and pulse until well combined. Scrape out of food processor into a bowl
- For the chicken: Place chicken on a cutting board and pat dry. Remove giblets if necessary. Loosen skin by inserting fingers between the skin and meat, breaking any membranes connecting the skin to the meat.
- Stuff garlic butter mixture evenly under skin. Working with 1–2 tablespoons at a time, stick a little mixture under the skin then spread out by pressing on top of the butter with your fingers under the skin or another hand on top of the skin. Repeat until all mixture is evenly used under skin over breast and legs.
- Place one half of the garlic inside the chicken cavity.
- Tie chicken legs together. Place a long piece of kitchen twine, about 3-feet long, on a surface. Place chicken in the center of the twine right at the top of the thigh. Take both pieces of twine in your hands and bring them down along the seam between the leg and breast. Loop twine inside the end of the leg and around, bringing both ends together and tying very tightly.
- Sprinkle chicken with a bit more salt. Create a foil rack and place in the bottom of the slow cooker. Twist a long piece of foil into a rope then shape into a circle, or ball up 3–4 pieces of foil and place in a triangle or square shape in the bottom of the slow cooker. Place remaining half of garlic head in bottom of slow cooker.
- Place chicken breast down on top of foil rack and cover. Cook on low heat 4–5 hours or until internal temperature registers 160°F.
- Remove ceramic cooker from heating element. Carefully flip the chicken from breast down to breast up. Brush the 1 tablespoon oil all over chicken skin and preheat broiler. Place ceramic cooker in oven about 10 inches from heating element. Watching carefully, broil until skin is evenly browned, then remove from oven.
- Remove chicken from cooker and place on a cutting board. Loosely tent with foil to rest. Replace cooker in slow cooker heating element and turn heat to high.
- For the gravy: Remove the garlic head from slow cooker. Sprinkle drippings with cassava flour and whisk well until smooth. Add in stock and cook 10–15 minutes. If the mixture does not thicken to your liking, transfer to a saucepan and cook a couple minutes over medium heat, whisking constantly.
- Carve chicken and serve with plenty of gravy.
Flavorful Instant Pot Whole Chicken
We love tasty chicken, and we especially love tasty chicken done in under an hour! Grab your instant pot multicooker and have dinner ready in a flash. *Note: for every pound add 6 minutes, for every half a pound add 3 minutes to total cooking time for whole chickens. Recipe provided by our blogger friend, Kate, from Root Revel.
Prep time: 10 minutes
Cook time: 45 minutes
Serving size: 4
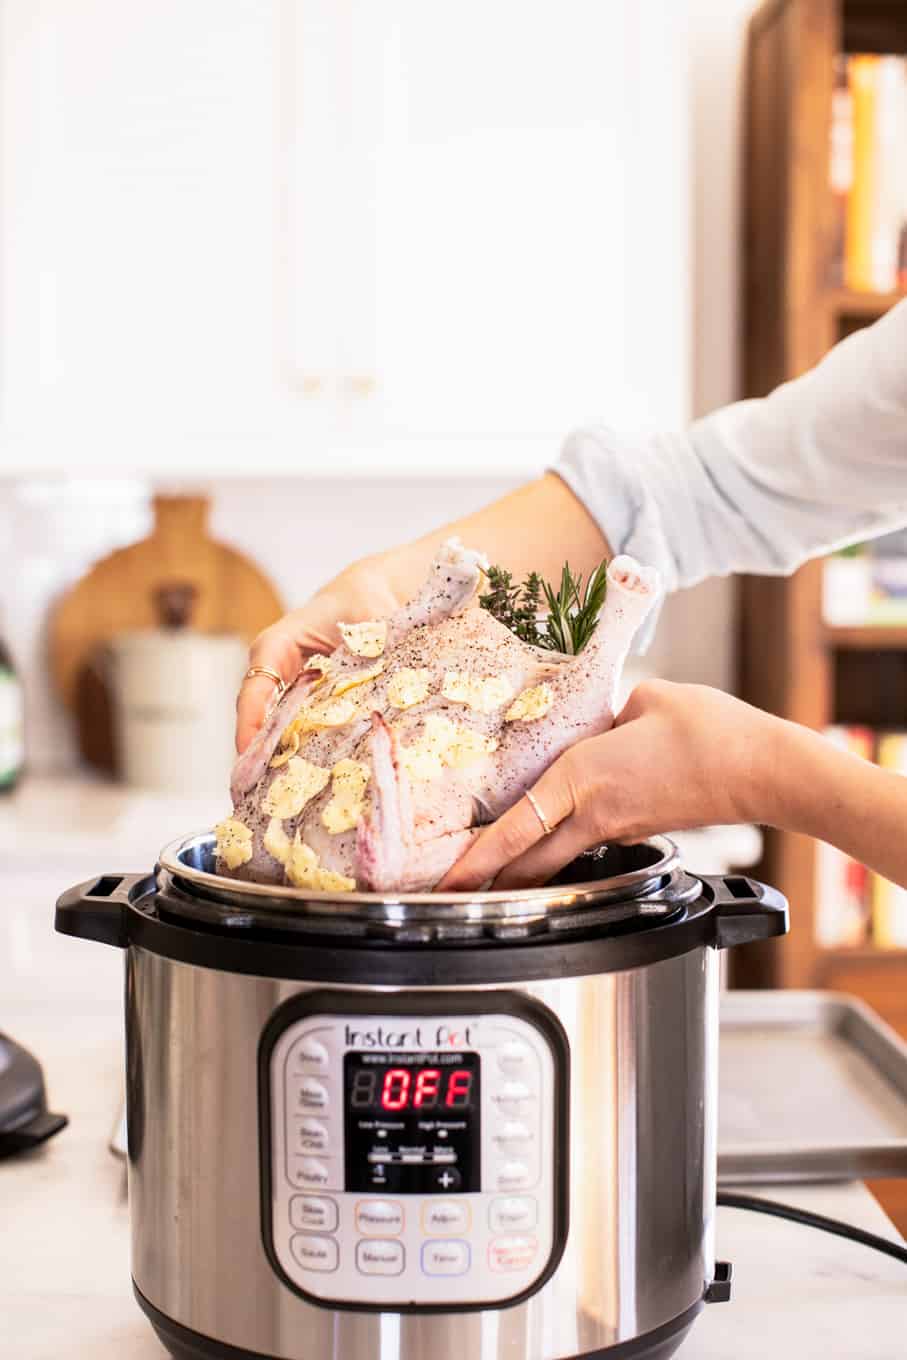
INGREDIENTS:
- 3 lbs. Sprouts Organic Whole Chicken
- 1 Garlic head
- 1/2 Sweet onion
- 1/2 Lemon
- 1 bunch Thyme
- 1 bunch Rosemary
- 1 bunch Sage
- 2 Bay leaves
- 6 Tbsp. Butter
- 1 1/2 cups Chicken broth
- 2 Tbsp. Salted white-truffle ghee
INSTRUCTIONS:
- Liberally salt and pepper the inside of the chicken. Stuff chicken with 1 head garlic, cut in half crosswise, onion, lemon, thyme, rosemary, sage and bay leaves.
- Gently loosen the skin from the chicken breast, lifting it from the meat with your fingers and rub about 3 tablespoons of butter under it. Rub 3 more tablespoons of butter all over the chicken surface and season with salt and pepper.
- Add a trivet with handles to the instant pot and add chicken broth. Place the chicken on top of the trivet and cover with the lid, lock it, point valve to sealed, press high pressure and set the timer for 20 minutes.
- Let the pressure naturally release for 15 minutes, followed by a quick release of the remaining pressure. Remove the chicken and test temp to ensure it’s cooked to 165°F. and place it on a baking sheet, breast side up. Brush 2 tablespoons melted truffle ghee over top of chicken.
- Broil for 5–8 minutes, or until skin is golden-brown and crispy. Serve and enjoy!
Taylor Farms
 Family owned and operated since 1995, Taylor Farms started in Salinas Valley, California, affectionately called America’s Salad Bowl. As a third-generation produce grower, Bruce Taylor followed in his family’s footsteps to build Taylor Farms into the largest producer of salads and healthy fresh food. Growing high-quality salads and vegetables begins with high-quality farming families and sustainable farming practices.
Innovation: The Art of Growing
By pioneering the industry’s first advanced automated harvesters, Taylor Farms increased productivity and provided an ergonomically beneficial environment for employees. From the fields to the processing plants, Taylor Farms continually works to advance industry best practices. They developed SmartWash™, a revolutionary produce wash system that’s helped raise the bar in food safety—keeping your wellbeing a priority.Environmental Sustainability
Taylor Farms is genuinely dedicated to protecting the health of our environment for future generations. Since 2012, Taylor Farms has completed ten major sustainability projects related to alternative and renewable energy, waste reduction and water conservation. With these renewable energy technologies, Taylor Farms has produced 53,326,167 KWh—offsetting 132,755 metric tons of CO2—the equivalent of taking 8,498 cars off the road annually!Thriving Communities
Giving back has been a part of Taylor Farms’ culture since day one, by sharing their success with the communities in which they live and work. They support their vision to create healthy lives through philanthropic programs focused on youth education and leadership, as well as health and wellness. In the past two years alone, Taylor Farms has donated over six million pounds of fresh produce.Their Passion
From their fields to your fork, Taylor Farms is passionate about making vegetables an exciting and delightful part of your healthy lifestyle. They believe fresh, flavorful greens create the foundation for enjoying vegetables in imaginative and delicious ways.Taylor Farms supplies one in three salads across the United States, they even supply our own Sprouts Brand salads and salad kits. We carry a wide variety of their healthy salads and greens for you to choose from.
Plant-based Nutrition: Where to Start
Are you thinking of going plant-based but not sure where to start?
Keep reading for the low-down on all things plant-based and quick tips to help you get started.
Keep reading for the low-down on all things plant-based and quick tips to help you get started.
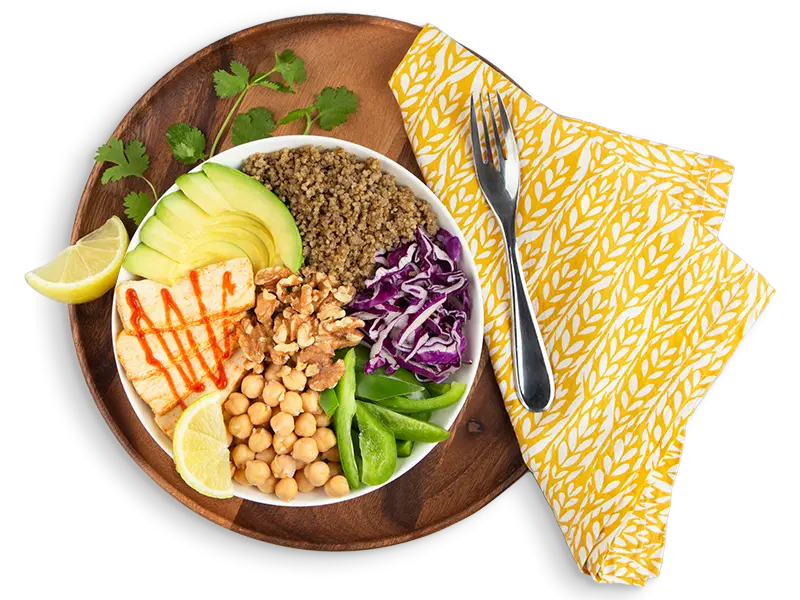
The Benefits of Plant-based Nutrition
Plant-based nutrition is the movement encouraging folks to incorporate more fresh produce, whole grains, legumes and nuts into their diet. From meatless Mondays to vegan breakfasts, people are beginning to recognize the benefits of plant-based nutrition.Good for You
A diet that incorporates more plant-based foods is shown to be higher in dietary fiber and lower in saturated fats and calories when compared to diets higher in meat and dairy intake. Eating more plant-based foods may also help maintain healthy heart function, blood sugar levels and cholesterol.Good for the Planet
The production of plant-based products has proven to be an environmentally sustainable enterprise. By reducing the production of animal-based products and increasing the consumption of plant-based products, communities can lower greenhouse gas emissions, and reduce waste and energy usage.Here’s How to Get Powered By Plants:
Plant-based proteins
Incorporate Plant-Based Proteins:- legumes
- nuts
- seeds
- whole grains
- plant-based protein powders
Dairy Alternatives
No-Moo Milk! Discover New Dairy Alternatives:- soy milk
- rice milk
- flax milk
- hemp milk
- oat milk
- almond milk
- cashew milk
- coconut milk
- macadamia milk
Meatless Meats
There’s No Miss-Steaks, You Heard That Right!- bean burgers
- soy burgers
- plant-based taco meat
- plant-based sausage
Plant-Based Essentials
Simple and Easy-To-Make Plant-Based Meals
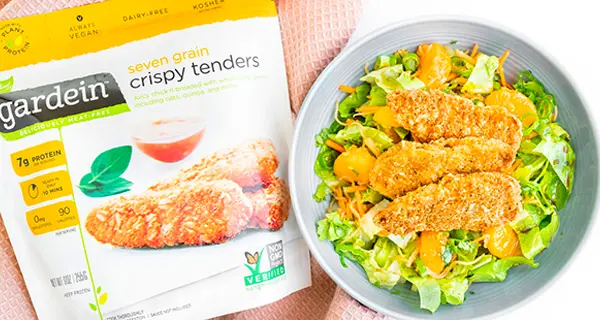
Asian Crispy Chick’n Salad
Get Recipe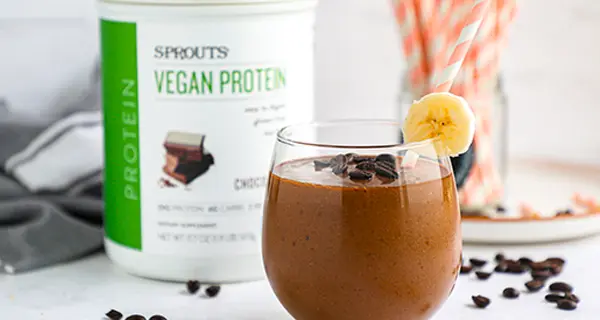
Vegan Protein Mocha Smoothie
Get Recipe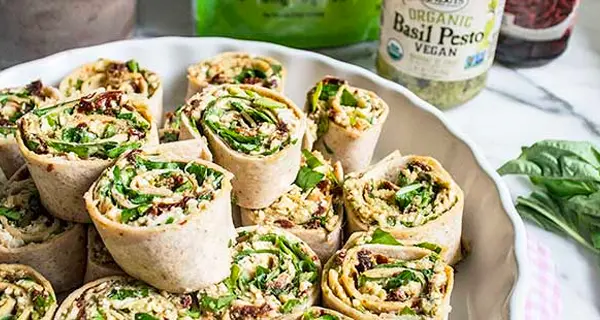
Pesto and Sun-dried Tomato Pinwheels
Get Recipe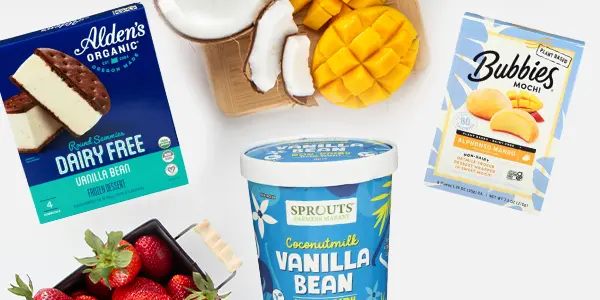
For Your Sweet Tooth
Shop Now
What is Regenerative Agriculture?
 Caring for the health of our soil has become an increasingly important endeavor as we better understand the role nutrient-rich soil plays in the quality of our food and ecosystem. Regenerative agriculture is a system of farming that works to progressively improve the soil, water and the environment. These farming methods can help take CO2, a powerful greenhouse gas, out of the atmosphere and put it back where it can do the most good—under our feet—and that’s where this story begins, with soil.
Carbon Sequestration
Green plants naturally take carbon out of the air as part of photosynthesis and turn it into simple sugars. The sugars are exuded from the plant’s roots into the ground, where it feeds microorganisms that live around the root base. Those microorganisms use the carbon-based sugars to build topsoil—capturing, or sequestering carbon from the atmosphere. When a thin layer of compost is added to this system, it sets up a cycle where the plants are able to capture more and more carbon each year.Cover Crops
Thoughtfully planted between other crops, cover crops can help to remedy soil shortcomings, keep weeds down, retain water and enrich the soil. This means the next crop will require less fertilizer, have a greater tolerance to drought and yield more.Another big plus to cover crops is they help to manage soil erosion.
No Till
Tilling the soil can lead to soil erosion, kill off the microorganisms necessary for healthy soil, encourage weed growth and can pack the soil making it harder for a crop to grow. Not tilling helps to create long-term soil fertility—organic soil that’s not tilled holds nutrients like a sponge, helping to create nutrient-rich food.Feed and Seed Program
Today, food waste accounts for 24% of all landfilled material. And, about 7% of all human-caused greenhouse gas emissions come from food waste. But together, we can be part of the solution to start to heal the planet. In partnership with Ancient Nutrition, we collect 10,000 lbs. of food scraps per week and deposit them on Regenerative Organic CertifiedTM farms to feed animals and regenerate topsoil.Coming soon …
Spring Break Travel Snack Tips
by Mary Ellen Phipps, MPH, RDN, LD founder of milkandhoneynutrition.com
It’s hard to believe, but winter is quickly coming to an end and before we know it spring will be here bringing warmer temps, yummy produce and the start of a big travel season.


Why Be Prepared
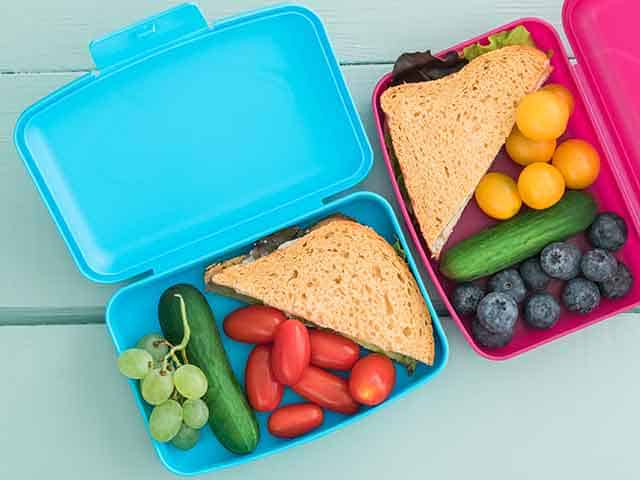
Whether you’re just making a day trip with the kids to your local zoo, setting out across the country for a fun-filled road trip, or hopping on a two-hour flight to your closest beach, there are a few reasons to make sure you come prepared with snacks from home. Cost: Buying snack foods in airports, or convenience stores is far more expensive than purchasing them at your local grocery store or making them at home. Gut health: The stress of travel alone can often throw gut bacteria out of whack. New-to-you snack foods purchased while traveling may create some GI distress as well. It’s a good idea to pack some tried-and-true favorites. Immune health: Our immune systems can be another victim of travel stress. If we’re not fueling our bodies properly, our immune system could take an even bigger hit – making us more prone to getting sick.A Few Things to Keep in Mind
Day Trip
Taking a day trip allows you the flexibility to pack both shelf-stable and refrigerated snacks in a cooler. If you plan to be gone all day, remember to pack substantial foods as well. Freezing some beverages and ice packs will keep things nice and cool. Any food that is supposed to be refrigerated should be kept on ice as long as possible. Once it is taken out of the cooler (or the cooler is no longer below 40°F), it should be consumed within two to four hours. If you’re ever in doubt, just throw it out. Day-Trip Snacks- Popcorn
- Dark chocolate rice cakes
- Bananas
- Oranges
- Energy bites
- Berries
- Yogurt
- Flavored water
- Sandwiches
- Chicken salad
- Snacking cheese
Longer Road Trip
For longer road trips, you’ll want to keep the same food safety precautions in mind as you would on day trips. Keep in mind that cooler snacks will only last one day or less depending on the length of your trip. If your road trip will be longer than one day, try to scout out your favorite grocery stores along the route—stocking up on refrigerated goods as you make your way to your destination. Some of my preferred shelf-stable, travel-friendly snacks include:- 100% uncured beef sticks
- Oat bites
- Apple sauce
- Nut butter
- Whole-grain bread
- Breakfast cereal
- Snack-size bars
- Nut butter pouches
- Other shelf-stable produce options like apples and grapes
Plane Trip
Plane trips are a bit different when it comes to picking out your snacks. You’ll need to consider what will fit in your carry-on bag as well as what security will allow you to bring. If you bring a cooler, make sure all the ice packs are frozen solid. Anything that is not frozen, including foods, beverages, and ice packs is subject to the TSA’s 3-1-1 rule. Plane trips are the perfect opportunity to shop delicious bulk snacks in the Bulk Department, where you can choose the amount that best fits in your luggage. Easy-to-pack items include:- Walnuts
- Chocolate-covered almonds
- Pistachios
- Dried mangos
- Pumpkin seeds
- Plantain chips
- Granola
About Mary Ellen
Mary Ellen Phipps, MPH, RDN, LD, is the Registered Dietitian, mom, food blogger and recipe developer behind milkandhoneynutrition.com. She’s also a type 1 diabetic and firmly believes food should bring us joy, not stress. Mary Ellen makes healthy eating easy, realistic and most importantly … fun! Visit her website and you’ll find yummy low-sugar, diabetes-friendly recipes the whole family will love … as well as helpful tips and a little mom humor.
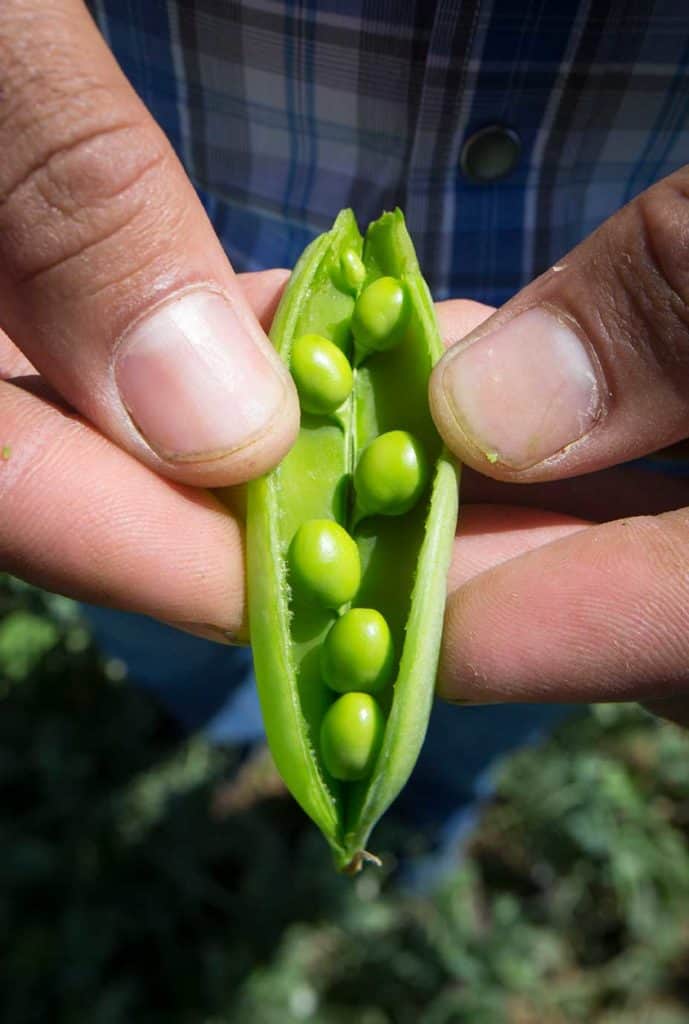
How to Prepare, Cook & Eat an Artichoke
Native to the Mediterranean region, the artichoke is the not-yet-bloomed flower of a thistle plant that is part of the sunflower family. Despite their slightly prickly exterior, artichokes are quite easy to prepare, cook and eat. Plus, they’re packed with antioxidants, vitamin C and dietary fiber.
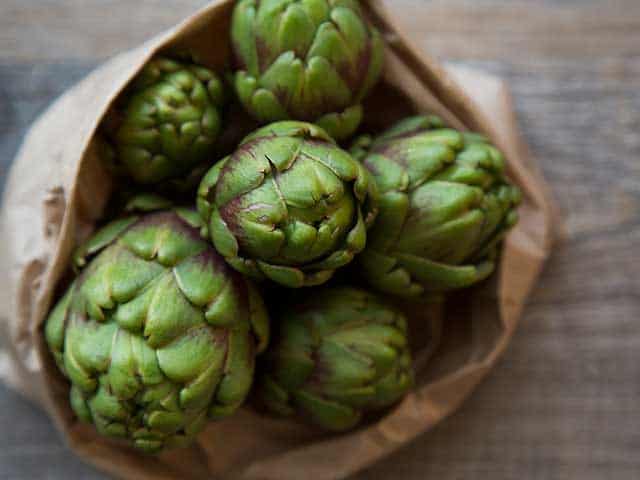
Easy Artichoke Prep
- Because they have sharp barbs, the first thing you’ll want to do in preparation is to cut the top cluster of barbs off with a sharp knife. This will remove about a quarter of the artichoke. Then, utilizing kitchen shears, cut the barbs off the tops of the remaining leaves.
- Now that the artichoke is easier to handle, remove the small leaves at the base, closest to the stem and cut the stem, leaving about a ½”.
- The final step is to rinse the artichoke under cool running water to remove any debris that might be trapped in between petals.
Cooking an Artichoke: It’s Easy!
- Add just enough water to a pot so that the water is just below the steamer basket. Cover and bring the water to a boil.
- Add the prepared artichoke, replace the lid and lower the heat to simmer the water. It will take 20-40 minutes to cook. After 20 minutes, you’ll want to check the artichoke(s) every 5 minutes. The color will change from fresh green to a more muted green and you’ll know it’s ready when you can easily remove a petal. TIP: Use tongs for this part—those petals will be really hot!
- Set aside and allow to cool a bit before eating it.
Now What? How to Eat an Artichoke
- Serve the artichoke right-side up on a plate.
- Remove a petal from the artichoke and eat only the bottom, whitish fleshy part of the petal that was closest to the base of the artichoke.
- You can certainly eat artichokes plain, or with a little salt & pepper. Try dipping them in melted butter or ghee, a tangy vinaigrette or a savory aioli.
Easy Aioli Recipe
INGREDIENTS:
- 2 Garlic cloves, pressed
- ¼ tsp. Kosher salt
- ½ cup Sprouts Organic Mayonnaise
- 2 Tbsp. Sprouts Organic Extra Virgin Olive Oil
- 1 Tbsp. Fresh lemon juice
- Freshly ground black pepper, to taste
DIRECTIONS:
- Mash garlic and salt in a small bowl until a paste forms.
- Whisk in mayonnaise, oil and lemon juice.
- Season with salt and pepper—enjoy!
Did you know?
One artichoke plant can produce up to 20 artichokes per year.
Mindful Consumption: Recycling Facts
Recycling seems pretty simple. But did you know things like cleanliness and contamination play into the whole system? To help you become a model recycler, we’ll be answering questions like, how clean is clean? And, can those plastic windows in envelopes be included with the paper?

Does recycling really matter?
Yes! Here’s a recycling fact: Recycling one aluminum can saves enough energy to run a TV for two hours, or a laptop for three hours or light a 100-watt bulb for 20 hours.
The Benefits of Recycling
When we choose to recycle things like paper, cardboard, glass and plastic, we’re sending less material to the landfill. At the same time, when those materials we divert from the landfill are reused, they’re saving other valuable natural resources like water, trees and minerals. Recycling also benefits our economy by creating a domestic source of materials. Last but not least, recycling saves energy.What Can Be Recycled?
The best answer to this question is: Check locally! Because recycling programs vary from one area to the next, there is no set answer for what materials can be recycled in your neighborhood. The non-profit organization, Keep America Beautiful, has a fantastic website to help you find information on the recycling programs in your area—searchable by zip code!
Containers
Is it really true that if you don’t clean your plastic, glass or can you ruin it for all the other recycles? Yes and no. If there are still a few schmears of mayo in the jar after you’ve rinsed it out, no harm done. But if the container has not been rinsed at all and/or contains leftover food or liquids, yes, it could contaminate other materials, especially in places that have a single-stream system. Consider this: An unrinsed food jar could come open or break somewhere in the process. If it gets on paper and cardboard recyclables, they’ll be ruined. You don’t have to spotlessly clean plastics and glass with soap and water, just rinse them so little to no food is left in them. And let them dry too. Wet containers with paper and cardboard aren’t a good combo—soggy items can contaminate a whole bundle of paper products.Paper
Crumpled paper, newspaper and cardboard are a-okay. Shredded however, in most cases, is not. You can use it in your compost pile as a brown/carbon. As for those pesky plastic windows in paper envelopes? It’s best to remove them before adding the envelope to the recycle bin. (Don’t worry if there is a little sliver of plastic that hangs on.) And unless you can completely separate the paper part of a bubble-wrap mailer from the plastic, those shipping envelopes will need to be reused or thrown in the garbage.Wishcycling
When you toss something in the recycling bin that you hope is recyclable, but aren’t sure, you’re wishcycling. The trouble with this practice is, if what you’re adding to the recycles truly isn’t recyclable, you run the risk turning vast amounts of potentially recyclable material into trash or at the very least, bringing the process to a halt at the recycling center. Keep in mind, just because something has the chasing arrows symbol on it does not mean it can go in the bin with everything else. Boost your eco-savvy by checking with your local municipality for the rules as to what can be collected in your area.Can You Recycle Plastic Bags?
Most recycling programs will not take plastic bags, even if it has the recycling logo on it. At Sprouts, we have containers at the front of every store where plastic bags can be recycled. Last year, our customers returned 22 million plastic bags to us, so we could recycle them for you. We also recycled 850,000 pounds of our own mixed recyclables including paper, plastic, aluminum and glass, as well as 80 million pounds of cardboard—that’s equivalent to 450,000 trees!Here’s another recycling fact:
It’s possible to turn an aluminum can into another aluminum product in as little as 60 days!
Facebook Live: Celebrate Citrus

Citrus Centerpiece
Use fresh citrus in an unexpected way to create a free-flowing wreath centerpiece. For added interest, incorporate homemade citrus candle holders.
Materials:
- 2 bunches Mixed greens foliage
- Bakers twine
- Wide variety of citrus (blood oranges, pink grapefruits, Cara Cara organes, Minneola tangelos, Meyer lemons)
- 2 votive candles
- 1 bunch of Sunflowers
Instructions:
- Divide the mixed greens foliage in half. Overlap the stems and secure with bakers twine. Lay on the surface where it will be displayed.
- Arrange citrus to overlap the stems. Halve and quarter a few citrus to fill in gaps.
- Create citrus candle holders by using a knife to cut the top off and hollow out citrus comparable to the size of votives, such as minneola tangelos. Cut a small sliver off the bottom of the citrus to create a sturdy base. Insert the votives. Add the citrus candles to the display.
- Trim sunflower stems and arrange throughout the centerpiece.
- Use any extra sprigs from the mixed greens foliage to add texture throughout the section of citrus.
Panna Cotta with Citrus Honey Preserve
Sweet, creamy- and citrusy! Check out Joanna’s perfect, easy-to-make dessert. Prepare up to 3 days in advance to serve a crowd.
Ingredients:
Panna Cotta:
- 1 qt. Heavy cream
- 1/2 cup White sugar
- 1/2 Vanilla bean, split with seeds scraped
- 2 1/4 tsp. Unflavored powdered gelatin
- 3 Tbsp.Water
Citrus Honey Preserve:
- 1 large Meyer lemon, thinly sliced
- 1 cup Clover honey
- 1 sprig Rosemary
Toppings:
- 1 large Meyer lemon, thinly sliced
- 1 Blood orange, thinly sliced
- 1 Tbsp. White sugar
- 1/4 cup Glazed or candied pecans, roughly chopped
- Rosemary and orange mint sprigs, for garnish
Instructions:
- To make the panna cotta: Combine the cream, sugar, vanilla bean and seeds in a saucepan. Bring to a simmer. Remove from heat, cover and allow to steep for 15 minutes. Uncover, remove the vanilla bean and bring back to a simmer. In a bowl, mix together the gelatin with water. Remove the cream mixture from the heat and stir in the gelatin until dissolved. Divide evenly between 8 ramekins. Cool to room temperature, cover with plastic wrap and refrigerate until set, a minimum of 3 hours.
- To make the preserve: Fill an airtight jar with the Meyer lemon slices, honey and rosemary. Seal with lid. Shake to ensure there are no air pockets under the fruit. Store in the refrigerator overnight. Shake occasionally to mix the juices with the honey.
- To make the topping: Preheat the oven to 200 degrees F. Line a baking sheet with parchment paper. Lay the citrus to dry.
- Assemble: Top each panna cotta with 1-2 tablespoons citrus honey preserve. Add a slice of each dried citrus slice. Divide the chopped pecans evenly amongst the panna cottas, and finish with rosemary and orange mint sprigs.
Zesty Ceviche
Speedy ceviche made with cooked shrimp. It is slightly sweet and tangy thanks to the Cara Cara oranges and pummelo grapefruit. Ingredients:
- 1 lb. Medium cooked shrimp, tails removed
- 1/2 cucumber diced
- 1 Large jalapeno, seeded and chopped
- 1 Vine ripe tomato, diced
- 2 Tbsp. Chopped red onion
- 1 Avocado, seeded and diced
- 1 Cara Cara orange, peeled and diced
- 1 Pink grapefruit, peeled and diced
- Juice of 1 lime
- Juice of 1 Cara Cara orange
- 3 Tbsp. Cilantro
Instructions:
- In a bowl, mix all ingredients.
- Cover and refrigerate until ready to eat. Serve with chips.