New Year Resolutions You Can Keep

Share article New Year Resolutions You Can Keep on:
FacebookTwitterPinterestPrint

Eat a variety of colorful foods

If your plate’s looking pale, that means you’re probably not getting a lot of nutrition from your food. One surefire way to make sure you’re eating right is by keeping it colorful. Brightly colored foods such as carrots, beets and spinach are nutrient-rich and packed with powerful antioxidants. Challenge yourself to pile on the purple, red, green and orange fruits and veggies.

Swap your sweets

Packaged, processed and high-fructose corn syrup treats gratify for seconds, but leave us feeling sluggish and bloated. This year, swap one of your go-to packaged snacks for the natural sugars of fresh and dried fruits. Fresh fruits like apples and bananas are fiber- and vitamin-rich, and dried fruits like apricots and cherries are great for snacking on the go. Basket of healthy vegetables

Eat what’s in season

When produce is in season, the relative abundance of the crop usually makes it less expensive at Sprouts. It’s the basic law of supply and demand, and when crops are in season you’ll be rewarded financially by purchasing what’s growing now.

Buy your grains and pasta in bulk

Buying in bulk helps you save money, reduce waste and stay stocked up for a home-cooked meal. Bulk up on a few staple dry goods items such as beans, rice and pasta. But make sure you’re purchasing items you’ll definitely eat—a deal isn’t a deal, after all, if you end up throwing most of it away.

Cook at home at least three nights a week

Eating and cooking at home saves money and keeps you in control of what you’re putting in your mouth. And it doesn’t have to be time-consuming. By planning ahead, you can stretch one big dish into several days’ worth of meals. Not sure what to make? Check out our archive of recipes for more ideas.

Start a vegetable garden

Growing your own food is a great way to get hands-on with your health goals. Tomatoes are chock-full of antioxidant-rich lycopene and vitamin C. Plus, they taste great and can be used in everything from sauces to salads and sandwiches. Not a tomato fan? Our starter kits make crisp carrots or sweet peas that are easy to grow.

Swap a harsh cleanser for natural solutions

Sprouts offers a variety of natural and inexpensive cleaning solutions that are easy alternatives to harsh cleansers. Most natural products are versatile and can be used on everything from bathroom tiles to kitchen surfaces and wood floors.  

Happy and Healthy Travels

Share article Happy and Healthy Travels on:
FacebookTwitterPinterestPrint

Traveling can be stressful on both your mental and physical health. Whether you’re traveling by a plane, train or automobile, we’ve got some tips to stay your healthiest and happiest this season. Vitamin C, mints, hand sanitizer mints, herbal zap, chapstick
  1. Boost your immune system. Cold and flu season often get the best of you during the holiday season, but maintaining a healthy immune system can help. Be sure to get that extra dose of vitamin C and zinc to help boost and maintain a healthy immune system.
  2. Keep clean. Hand sanitizing wipes are convenient when soap and water aren’t available, which can happen quite often while traveling. Grab a small pack of wipes to keep in your backpack, carry-on or car to help prevent the spread of germs.
  3. Plan ahead. If you’re taking a road trip, make sure your car is in tip-top shape. If you’re flying, check the weather for unexpected delays. Making a list (and checking it twice) will help you stay prepared for anything this busy season may bring your way.
  4. Reduce stress. Catching flights, large crowds and exhausting errands create added stress to your daily routine. Take some time to relax with the help of essential oils and natural stress relief pastilles.
  5. Enjoy time with friends and family. It’s easy to get wrapped up in the stresses of traveling, but remember, this is the time to be grateful for loved ones and the joy that they bring. Take some time to take a deep breath and appreciate the little things this season has to offer.
 

Non-Toxic Cleaners You Can Make at Home

Share article Non-Toxic Cleaners You Can Make at Home on:
FacebookTwitterPinterestPrint

Now that spring has arrived, it’s time to freshen up our winter-weathered homes. Unfortunately, the often-toxic ingredients found in most conventional cleaning products can be just as harmful as the dirt and germs they are meant to eliminate. The good news is that spring cleaning doesn’t have to be dirty work. You can avoid the toxins in most conventional cleaning products by making your own. White, distilled vinegar is great for disinfecting, degreasing and non-toxic cleaning. It’s also extremely economical and readily available. Note: The smell of vinegar does dissipate fairly quickly, but if the stench bothers you, try scenting it with fragrant essential oils.different cleaning bottles

What You’ll Need:

  • Aura Cacia Essential Oils (we recommend lemon, peppermint, eucalyptus, tea tree)
  • Sprouts Baking Soda
  • Bronner’s Liquid Castile Soap
  • White distilled vinegar
  • Clean distilled water
  • Toilet brush
  • Spray bottles
  • Cotton cloths

Disinfecting Surface Cleaner

Wipe away grime with this gentle, yet effective surface cleaner. Mix equal parts vinegar and water to disinfect walls, doorknobs, crib rails, and so on. If desired, add 5–10 drops of essential oil, per 2 cups of mixture. Dampen a sponge mop or cloth with the mixture and get to work!

Mirrors and Windows

To give your windows and mirrors a smudge-free shine combine 1/4 cup white distilled vinegar and 2 cups of water. Add 12 drops of lemon essential oil for added fragrance. Pour the ingredients into a clean spray bottle and shake well. Spray on surface and wipe with a clean cloth.

Multipurpose Cleaner

From the stovetop to the countertop, keep your home clean, fresh and safe with this multipurpose “greener” cleaner. Take an empty spray bottle and combine 1 tablespoon of liquid Castile soap, 1/2 cup of white distilled vinegar and 1 1/2 cups of water. We recommend lemon, tea tree, eucalyptus or lavender essential oils to create a sweet and wholesome scent. Put the cap on and shake well.

Toilet Cleaners

For regular toilet seat wipe downs, straight vinegar will do the trick. For tougher jobs, combine 1/2 cup baking soda, 1 cup distilled white vinegar and 1/2 teaspoon of tea tree essential oil in a spray bottle. Spray the bowl and allow the mixture to sit for a few minutes. Sprinkle baking soda inside the toilet. Then, scrub with a brush and flush.

Bath and Shower

The best way to prevent soap and scum from building up is to regularly spray the bath and shower walls with vinegar. For a deep cleaning, make your own soft soap cleaner with baking soda and Castile soap. Use the baking soda in place of scouring powder. Sprinkle it liberally on porcelain fixtures and rub with a wet rag. Add a little soap to the rag for more cleaning power.  

Mother’s Day Mason Jar Vases

Share article Mother’s Day Mason Jar Vases on:
FacebookTwitterPinterestPrint

Nothing says “I love you” quite like a bouquet of freshly cut flowers. This Mother’s Day, why not take it a little step further and create these beautiful, DIY hand-painted mason jar vases that you know she’ll love. Better yet, if you’ve got little ones of your own, get them involved too! Mix and match multiple colors or simply choose the ones that go wonderfully with her favorite flowers. Either way, these do-it-yourself vases are easy to make, plus, Mom will know that they were painted with love.

Here’s what you’ll need:

  • Mason jars
  • Chalk paint in your preferred colors
  • Sandpaper
  • White chalk
  • Clear acrylic spray
  • Paintbrush

1. Paint the outside of each mason jar with chalk paint and let dry for one hour before applying another coat.

2. After the jars have completely dried, use sand paper to take the paint off of the raised, designed areas of the jar.

3. Rub white chalk over jar to create a distressed look.

4. Seal jars by spraying thoroughly with clear acrylic spray and let dry for at least two hours.

5. Once dry, add your mom's favorite fresh flowers.

Ice Cream Float Bar

Share article Ice Cream Float Bar on:
FacebookTwitterPinterestPrint

Summer is in full swing and what better way to celebrate the season than with a DIY Ice Cream Float Bar? Kids will love the option of creating their own recipes and adults will enjoy the nostalgia of this diner delight. Keep cool with these tips on how to create the perfect ice cream float bar.ICE CREAM BAR FLOATWhile you can’t go wrong with traditional vanilla, mix things up by providing a variety of flavors like mint chocolate chip or strawberry. You can find a number of dairy-free ice creams that will satisfy any sweet tooth. Sneak in an extra serving of fruit by dicing up fruit popsicles as a colorful option. Save time by prepping your ice cream the night before, by pre-scooping and freezing on a cookie sheet. Keep your frozen treats cool by serving the containers on ice.

The Drinks

Along with good old root beer, be sure to offer a variety of sodas for guests to mix and match flavors. To keep things even more interesting, add cold brew coffee, flavored seltzer water, sparkling lemonade and even kombucha to the mix. Be sure to display some adorable patterned straws for an added touch of color.SODA, STRAE AND ICE CREAM

The Toppings

To make your ice cream float bar extra special, you’ll need more than just a cherry on top! Fresh fruit, crushed graham crackers or marshmallows are just a few of our favorite toppings. Stop by our Bulk Department to pick up just enough dried fruits, chocolate or gummi bears to make your guests’ floats even more unique.

CHERRIES, STRAWBERRIES, MARSHMELLOW, CHOCOLATE CHIPS AND COCONUT


The Pairings

Give guests inspiration by creating a chalkboard with different recipes for one-of-a-kind pairings. Don’t know where to start? Here are some recipes that we’re loving.
  • Mint Mocha – 2 scoops mint chocolate chip, cold brew, chocolate sauce drizzle
  • Strawberries & Cream – 2 scoops strawberry, 1 can cream soda, fresh strawberry garnish
  • S’mores 2 scoops chocolate, 1 can root beer, whipped topping, graham cracker crumbs and mini chocolate chips
  • Strawberry Lemonade 1 strawberry popsicle, sparkling lemonade, crushed mint leaves
  • Blueberry Kombucha – 2 scoops vanilla, 1 blueberry kombucha, fresh blueberries
POPSICLES, TALENTI ICE CREAM AND SPROUTS ICE CREAM

Homemade Gifts in a Jar

Share article Homemade Gifts in a Jar on:
FacebookTwitterPinterestPrint

Cookies in a mason jarSome hosts are so easy to shop for: bottle of wine or scented candle. But if you’re trying to stay within a holiday budget or think of a creative gift idea for the person who “has everything”, these gifts are the perfect solution. Gifts in a jar are festive, heartfelt, easy and delicious. Not to mention, cost effective for you! Simply layer the ingredients in a jar, add a ribbon and tag, and you have a simple but stylish gift.

Soup Mixes

For an easy shortcut to homemade jar gifts, simply visit our Bulk Department and find your favorite soup mix. Pour the mix into a jar and be sure to include cooking instructions on a gift tag.

Baking Mixes

Give the gift of baking by attractively assembling all of the dry ingredients needed for cookies, muffins or brownies in tall glass jars. Use pretty ribbons to tie on the recipe, along with a wooden spoon or whisk for an extra special touch. Friends will be encouraged to easily bake their own treats that come from the heart, not a box!

Ingredients:

  • 1 cup Packed brown sugar
  • 1/2 cup White sugar
  • 1 1/2 cups Semisweet chocolate chips
  • 2 cups All-purpose flour
  • 1 tsp. Salt
  • 1 tsp. Baking soda

Instructions:

Combine all the dry ingredients in a large bowl. Add 1 slightly beaten egg, 1/2 cup melted butter and 1 teaspoon vanilla. Stir until well mixed. Drop by rounded spoonfuls on greased cookie sheet and bake at 350°F for 8–10 minutes. Allow to cool, then enjoy!

Bulk Candy & Nuts

Our Bulk Department is a snack lover’s paradise. Fill a mason jar with an assortment of candy, dried fruit and/or nuts, tie it with some beautiful wired ribbon, and you’re on your way. For the avid hiker on my holiday list, I combined six of my favorite bulk ingredients to make a trail mix that’s full of energy, flavor and texture. You could certainly layer each ingredient separately for a more artistic presentation.

Ingredients:

  • Cashews
  • Almonds
  • Pistachios
  • Dark chocolate chips
  • Dried cranberries
  • Dried cherries
 

DIY Baked Goods in a Jar

Share article DIY Baked Goods in a Jar on:
FacebookTwitterPinterestPrint

Give the gift of baking by attractively assembling all of the dry ingredients needed for cookies, breads or brownies in tall glass jars. Use pretty ribbons to tie on the recipe, along with a wooden spoon or cookie cutter for an extra special touch. Don’t forget to print out and attach the recipe cards to the jar mixes! Baked Goods Here are a few tasty suggestions to get you started.

Gluten-Free Gingerbread Cookies

Ingredients:

  • 3 1/2 cups Coconut flour
  • 2 tsp. Ground ginger
  • 1 tsp. Ground cloves
  • 1 tsp. Ground cinnamon
  • 1 tsp. Ground allspice
  • 1 tsp. Baking powder
  • 1 cup Brown sugar
  • 1 tsp. Vanilla extract
  • 1/4 cup Solid coconut oil, melted
  • 2 Eggs

Instructions:

  1. Preheat oven to 375ºF. Line a baking sheet with parchment paper.
  2. In a medium bowl, whisk together eggs, melted coconut oil, brown sugar spices and vanilla. Using a rubber spatula, fold in coconut flour.
  3. Scoop cookie batter onto prepared baking sheet using a small ice cream scoop or 2 teaspoons. Bake for 10–12 minutes, or until golden. Cool completely before removing from the pan.

White Chocolate Cranberry Blondies

Ingredients:

  • 3/4 cup Softened butter
  • 1 1/2 cups Brown sugar
  • 3 tsp. Vanilla extract
  • 1 Egg
  • 1 1/2 cups Flour
  • 1 tsp. Baking powder
  • 1/2 tsp. Salt
  • 1 cup Dried cranberries
  • 1 cup White chocolate morsels

Instructions:

  1. Preheat oven to 350ºF. Line a medium pan with parchment paper.
  2. Soak cranberries in bowl with hot water for 3 minutes. Drain water from cranberries.
  3. Cream butter, brown sugar, vanilla and eggs. In a separate bowl, mix flour, baking powder and salt. Stir the dry ingredients into the butter-sugar mixture with a wooden spoon or large rubber spatula. Carefully mix in cranberries and white chocolate morsels.
  4. Press mixture evenly into pan and bake for 20 minutes. Let cool for 30 minutes and enjoy!

Pumpkin Bread

Ingredients:

  • 1 2/3 cups Flour
  • 1 cup Sugar
  • 1 tsp. Baking soda
  • 1 tsp. Cinnamon
  • 1/2 tsp. Baking powder
  • 1/2 tsp. Nutmeg
  • 1/4 tsp. Ground cloves
  • 2 Eggs
  • 1 cup Sprouts Canned Pumpkin
  • 1/2 cup Water
  • 1/2 cup Chocolate chips, optional

Instructions:

  1. In a large mixing bowl, combine the flour, sugar, baking soda, spices and baking powder. In a small bowl, whisk the eggs, pumpkin and water. Stir into dry ingredients until moistened. Fold in chocolate chips if desired.
  2. Pour into a greased loaf pan. Bake at 350°F for 55–65 minutes until a toothpick inserted in the center comes out clean. Cool in pan for 10 minutes before removing.

Peppermint Brownies

Ingredients:

  • 1 cup Sugar
  • 2/3 cup Cocoa powder
  • 1 cup Sugar
  • 1 cup Crushed peppermint sticks
  • 1 1/4 cups Flour
  • 1 pinch of Salt
  • 1 cup Butter
  • 1/4 cup Boiling water
  • 2 tsp. Vanilla extract

Instructions:

  1. Preheat oven to 350ºF. Line an 8 x 8-inch baking dish with parchment paper, allowing excess paper to overlap the edges.
  2. In a medium bowl, whisk the flour and sugar; set aside.
  3. In a separate bowl, add the cocoa powder and salt. Add the boiling water and stir with a rubber spatula until the chocolate is melted and the mixture is paste-like. Add sugar, vanilla and butter, mix using an electric mixer until smooth. Using a wooden spoon, slowly stir in the flour mixture, and mix until combined.
  4. Spoon the brownie batter into the prepared baking dish, batter consistency will be thick. Smooth top with a rubber spatula. Bake for 35 minutes or until the brownies are cooked through. Cool in the pan or a wire rack for 1 hour.
 

DIY Valentine’s Day Gifts

Share article DIY Valentine’s Day Gifts on:
FacebookTwitterPinterestPrint

Go ahead, wear your heart on your sleeve and embrace the sentimental feelings in the air. Valentine’s Day is the perfect time to share a bit of your heart with others. The best news? You don’t have to stick with the standard gifts that may come to mind. With these easy-to-make and thoughtful DIY ideas, you can brighten the day of a special someone, friend, family member or colleague. Hot Cocoa

Peppermint Infusion Hearts

What You’ll Need:

  • Crushed peppermint
  • Coffee filters
  • Baker’s thread
  • Construction paper
  • Hot chocolate

Directions:

Using a folded coffee filter, cut out a heart shape. After you have two heart shapes, stitch together around the edges until only a small opening remains. Place peppermint candies in a plastic bag and crush until the pieces are broken down. Put about a spoonful of crushed peppermint inside the small opening of the coffee filter and finish stitching until it’s closed. Attach a medium-length piece of baker’s thread to your peppermint-filled heart. Cut a small heart out of paper and add it at the other end of the thread to make a little “tag” like the ones that tea bags have. Present the gift with hot cocoa for a refreshing peppermint twist on a classic chocolatey treat.    

Homemade Lotion Bars

What You’ll Need:

  • 1 cup Beeswax
  • 1 cup Coconut Oil
  • 1/2 cup Shea butter
  • Silicon heart-shaped mold
  • 25 drops Lavender essential oil
  • At least 2 hours for refrigeration

Directions:

Start by warming beeswax in a double boiler until it becomes smooth. Add coconut oil and melt the two ingredients. Stir until smooth and add lavender essential oils. Let cool and place in silicon molds and refrigerate for at least 2 hours.              

“Simply Nuts for You” Mason Jar“

What You’ll Need:

  • Chalkboard spray paint
  • Painter’s tape
  • Chalk
  • Trail mix
  • Gift tag
  • Twine or ribbon

Directions:

Create a heart shape on the mason jar with painter’s tape. Using an open area, cover the mason jar with the chalkboard spray paint. Once it’s dry, carefully peel off the tape. Add a personalized touch by making a design with white chalk. Cut out a gift tag and create a small hole at the top. Thread twine through and loop around twice at the top of the mason jar. Pour in your special someone’s favorite trail mix.

Dry Rub Recipes

Share article Dry Rub Recipes on:
FacebookTwitterPinterestPrint

All the grill masters in your life will love these flavorful DIY dry rub recipes and you’ll love how easy they are to make! Paired with a new set of grilling tools, these create a great gift. Dry rub recipes

All-Purpose Spice Rub Recipe

  • 2 Tbsp. Coffee beans, finely ground
  • 1 1/2 Tbsp. Kosher salt
  • 1 1/2 Tbsp. Granulated garlic
  • 1 tsp. Black pepper
  • 1/4 tsp. Cayenne pepper
  • 1/4 tsp. Ground cloves
  • 1/4 tsp. Cinnamon
Mix all ingredients together and store in an airtight container.

Caribbean Rub

  • 3 Tbsp. Brown sugar
  • 3 Tbsp. Paprika
  • 1 Tbsp. Cinnamon
  • 1 Tbsp. Coarse salt
  • 2 tsp. Ground ginger
  • 1 tsp. Allspice
  • 1 tsp. Cayenne pepper
  • 3/4 tsp. Nutmeg
  • 3/4 tsp. Freshly ground black pepper
Mix all ingredients together and store in an airtight container.

Buffalo Spice Rub

  • 1/2 cup Brown sugar
  • 1 Tbsp. Chile powder
  • 1 Tbsp. Smoked paprika
  • 1 Tbsp. Cumin
  • 1 tsp. Cayenne, plus more for taste
  • 2 Tbsp. Garlic powder
  • 1 Tbsp. Ground mustard
  • 2 Tbsp. Kosher salt
  • 1 Tbsp. Freshly ground black pepper
Mix all ingredients together and store in an airtight container.

DIY Father’s Day Gifts

Share article DIY Father’s Day Gifts on:
FacebookTwitterPinterestPrint

Father's Day Gift Basket Say thank you to all the doting dads and handsome heroes this Father’s day. After all, where would we be without dad jokes, practical advice and bear hugs?If the standard gifts are feeling a little tired, we have a few ideas to “tie” this Father’s Day together. Check out these fun gifts that he’s sure to love, including one by blogger, Julie, from Fort Worth Moms Blog! 
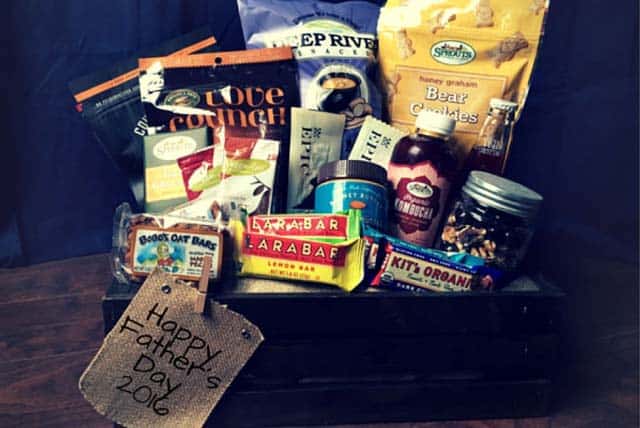
Julie shares her process in creating a one-of-a-kind gift for Dad. Keep reading to learn how to make your own unforgettable gift: I considered a basket of grilling items. After all, it is summer, and summer is grilling season. Sprouts has a huge selection of fresh produce, meats, spices for DIY dry rubs and craft beers, microbrews, etc. But goodness, y’all! I am weeks away from delivering our second baby. Everyone here needs to stay ready-to-jump-behind-the-wheel-at-any-moment sober (so no alcohol), and I refuse to step outside into the heat for any reason (so no outside cooking for us). I had to rethink my plan. Because a trip to Labor & Delivery is in our near future, I decided he needed a “We’re Having a Baby, Baby” basket. Read more of Julie’s full story!    
Rosemary Shaving Cream

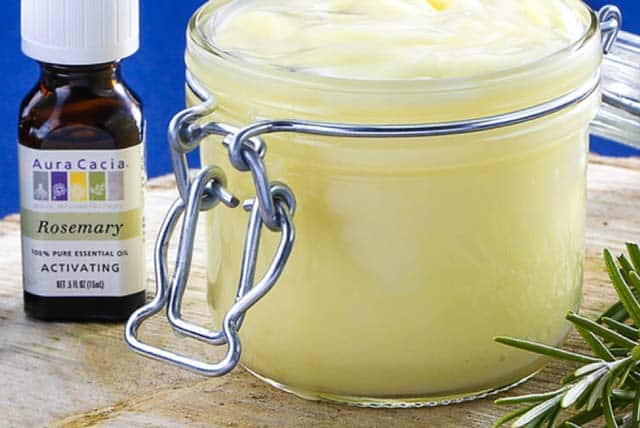
Rosemary and Peppermint Shaving Balm

Your dad will feel pampered and refreshed after using this rosemary mint shaving balm—and will love knowing that it was made with love, by yours truly!

Ingredients:

• 1/3 cup Shea butter • 1/4 cup Virgin coconut oil • 1/4 cup Jojoba or sweet almond oil • 10 drops Rosemary essential oil • 3-5 drops Peppermint essential oil

Instructions:

1. Place a small saucepan over low heat and mix shea butter and coconut oil, stirring until melted. Transfer mixture to a heat-resistant bowl and add in jojoba oil (or almond oil), then the essential oils and stir. 2. Chill mixture in the refrigerator until solid. Once solid, remove from refrigerator and whip mixture using a beater. Mix until light and fluffy. Store in an airtight container for up to one month. Note: This shaving lotion is soap-free and will not create a lather, but rather, a protective barrier between the razor and skin. Swish razor in water between strokes and enjoy!
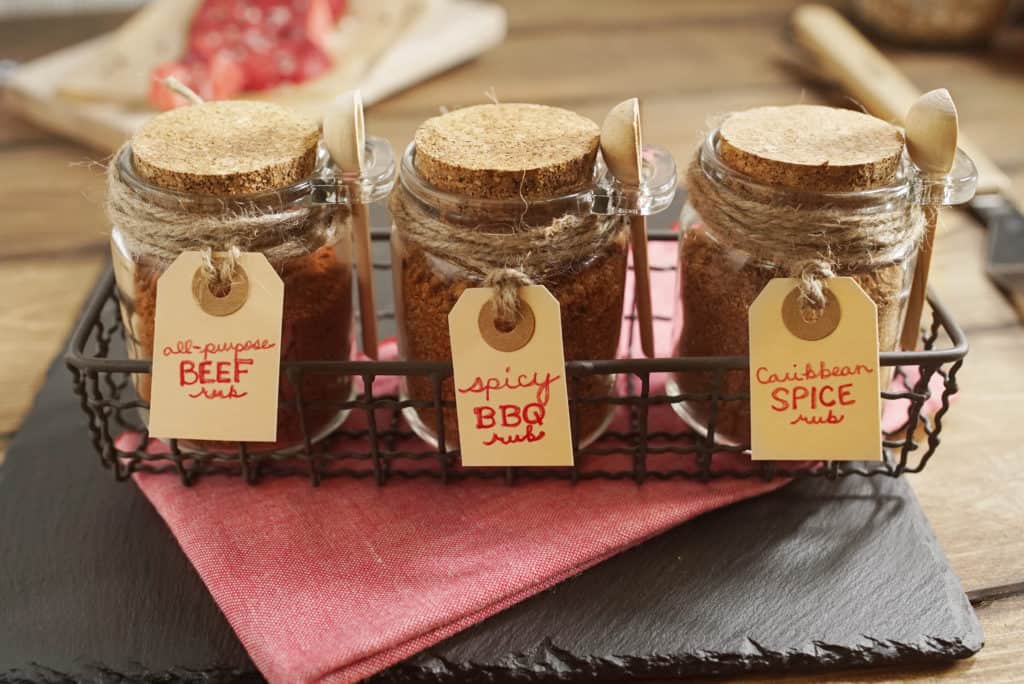
Dads Dry Rub

Dad’s Day BBQ Rub

Here’s a super easy and thoughtful gift that you can gather from our Bulk Department! Let your inner artist out by layering spices to create a colorful complement to your summer barbecues.

Ingredients:

• 1 1/2 Tbsp. Chile powder • 1 tsp. Black pepper • 1 1/2 tsp. Onion powder • 1 Tbsp. Thyme • 2 Tbsp. Sea salt • 1 tsp. Garlic salt

Instructions:

Layer spices multiple times into a small mason jar and seal. Decorate with a ribbon or twine.